
Designed to meet the evolving needs of modern households, HomePure is currently at the pinnacle of water filtration technology, ensuring that every drop of water that flows through it is clean, refreshing, and free from harmful contaminants. With its advanced filtration system and user-friendly design, the HomePure Nova, in particular, has become an indispensable addition to homes worldwide, providing a healthier lifestyle and peace of mind to families everywhere.
HomePure Nova maintenance is a breeze whether you’re a seasoned DIY enthusiast or a new homeowner. Our comprehensive video instructions and easy-to-follow guides cover every component, from the LED indicator to the cartridge valve, making it effortless to ensure your water filter remains in peak condition for years to come. With our simple step-by-step tutorials, you can ensure you and your family can always enjoy clean, refreshing water at your convenience, all from the comfort of your own home.
HomePure Nova Maintenance Guide
Installing New Batteries
The HomePure Nova is an environmentally friendly filtration unit that is battery-operated, so it does not need to be plugged into an electric source to function. A new set of batteries usually lasts a year with regular use, so if you normally replace your filter cartridge once a year, you can also change your HomePure Nova unit’s batteries at the same time.

- Remove the flexible pipe cover and pull off the top cover.
- Remove the retainer ring to unlock the filter.
- Turn on the valve and press the ejector firmly to remove the head adapter from the filter unit.
- Place two (2) AA batteries in the battery socket found in the head adapter.
- Reassemble the head adapter and filter.
- Lock the retainer ring between the head adapter and the water tank firmly to avoid breakage.
- Place the top cover back onto the filter.
- Connect the flexible pipe to the nozzle.
Replacing the LED Indicator
The LED indicator is vital for monitoring HomePure Nova’s performance. When there is no LED light even though the unit is working just fine, or if the yellow light beeps even after you’ve changed the batteries, it means your LED indicator PCB set is malfunctioning and needs to be replaced.

- Remove the flexible pipe cover and pull off the top cover.
- Remove the retainer ring to unlock the filter.
- Turn on the valve and press the ejector firmly to remove the head adapter from the filter unit.
- Twist the filter cartridge to release it from the head adapter.
- Open the battery cover and remove the batteries.
- Remove all four (4) plastic seals from the head adapter.
- Remove the screws that were under the plastic seals.
- Press the ejector firmly to remove the top part from its base.
- Unscrew the first part of the LED indicator PCB set.
- Turn the head adaptor upside down.
- Unscrew the second part of the LED indicator PCB set.
- Remove the battery case.
- Remove the LED indicator PBC set from the head adapter.
- Attach the new LED indicator PBC set.
- Place the battery and battery cover back in place.
- Reassemble the top part with the head adapter.
- Place the plastic seals back onto the head adapter to conceal the screw holes.
- Reattach the filter cartridge to the head adapter.
- Place the filter and head adapter back into the unit. Ensure that it locks firmly in place.
- Reassemble the retainer ring and all other parts.
Replacing the One-Touch Elbow Fitting
The one-touch elbow fitting secures the connection between your HomePure Nova and water source. How do you replace a leaking elbow fitting?

- Use a spanner to press the upper ring of the elbow fitting, releasing it from its connecting hose.
- Place the new elbow fitting in its place.
- Ensure that it fits perfectly with the connecting hose.
Securing Seal with O-Ring Replacement
The O-ring provides a tight seal for your HomePure Nova, preventing water from leaking onto the unit’s side. Replacing it is very easy.

- Remove the flexible pipe and take off the top cover.
- Remove the retainer ring to unlock the filter.
- Turn on the valve and press on the ejector firmly to remove the head adapter and the filter from the unit.
- Twist the filter cartridge to release it from the head adapter. There you will find the O-ring.
- Remove the old O-ring from the head adapter by pulling it off gently.
- Replace it with the new O-ring.
- Reattach the filter cartridge to the head adapter, place the filter and head adapter back into the unit, and reassemble the remaining parts.
Replacing Knob Set
The knob set is basically the water switch of your HomePure Nova — set to open, and the water flows out from the unit; turned to close, the water stops. Replacing a broken knob set is very easy!
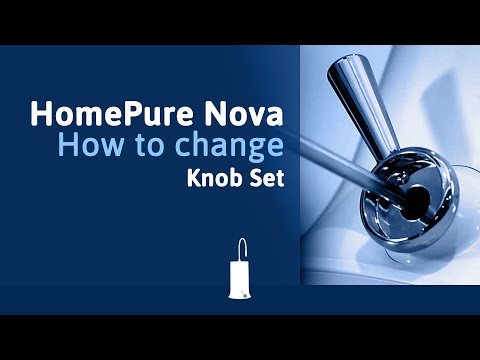
- Use a paper clip to remove the chromium pen.
- Unscrew the knob set to remove.
- Replace with the new knob set by setting it into place and screwing it on.
- Ensure all components are attached properly.
Restoring the Flexible Pipe
The flexible pipe is what brings the water from the HomePure Nova to your container of choice. If water is starting to leak from the pipe, then it’s time to replace it.

- Unscrew the flexible pipe from the top cover with your hand.
- Replace with a new flexible pipe by screwing it back on and ensuring it fits securely.
Replacing the Connecting Hose
The connecting hose ensures a reliable connection for your HomePure Nova and water source. When water leaks from the bottom near the water inlet hose, it means the connecting hose is damaged and needs to be replaced.

- Press the spanner on the upper ring of the elbow fitting to release it from the connecting hose.
- Press down on the ring inside using the spanner while pulling on the connecting hose to detach it from the unit.
- Attach the new connecting hose and elbow fitting. Ensure the hose fits perfectly.
Changing the Cartridge Valve
The cartridge valve controls the flow of water within your HomePure Nova. Often, when there’s an accumulation of high levels of hard calcium from the water source over a long period of use, it can damage the unit’s cartridge valve and cause leakage.
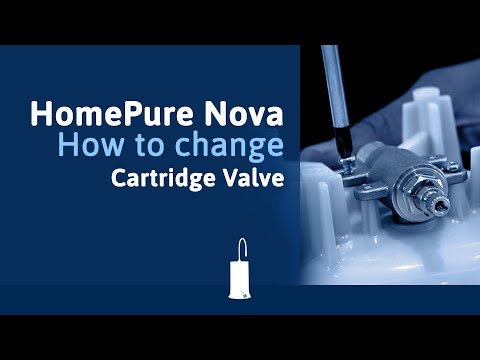
- Remove the flexible pipe and pull off the top cover.
- Remove the retainer ring to unlock the filter.
- Turn on the valve and press the ejector firmly to remove the head adapter and filter from the unit.
- Use a paper clip to remove the chromium pen.
- Use a screwdriver to remove the knob set.
- Turn the unit upside down.
- Press down on the ring inside using a spanner while pulling on the connecting hose to detach it from the unit.
- Remove the bottom part of the unit with a screwdriver.
- Unscrew the cartridge valve from the one-filter case.
- Attach the new cartridge valve.
- Reassemble the housing and bottom part of the unit.
- Reattach the connecting hose and knob set. Ensure all components fit properly.
- Place the filter and the head adapter back into the unit. Ensure that it locks firmly in place
- Reassemble all the other parts.
Swapping the One-Filter Case
The one-filter case houses the filter cartridge in your HomePure Nova. You’ll know it’s damaged when water starts leaking around the seal between the unit’s base and housing. Follow steps similar to changing the cartridge valve but focus on replacing the one-filter case instead.
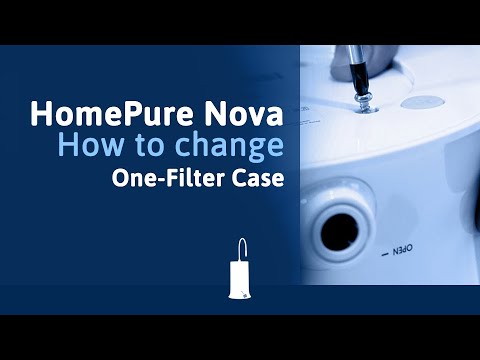
- Remove the flexible pipe and pull off the top cover.
- Remove the retainer ring to unlock the filter.
- Switch the valve on and press the ejector firmly to remove the head adapter and filter from the unit.
- Use a paper clip to remove the chromium pen.
- Use a screwdriver to remove the knob set.
- Turn the unit upside down.
- Press down on the ring inside using a spanner while pulling on the connecting hose to detach it from the unit.
- Remove the bottom part of the housing unit with a screwdriver.
- Unscrew the cartridge valve from the one-filter case.
- Remove the old one-filter case and replace it with the new one.
- Reassemble the cartridge valve onto the one-filter case.
- Reassemble the housing and bottom part of the unit.
- Reattach the connecting hose and knob set. Ensure all components fit properly.
- Place the filter and the head adapter back into the unit. Ensure that it locks firmly in place
- Reassemble all the other parts.
Upgrading the Head Nozzle
The head nozzle ensures proper water dispensing from your HomePure Nova. Follow steps similar to changing the LED indicator but focus on replacing the head nozzle instead.
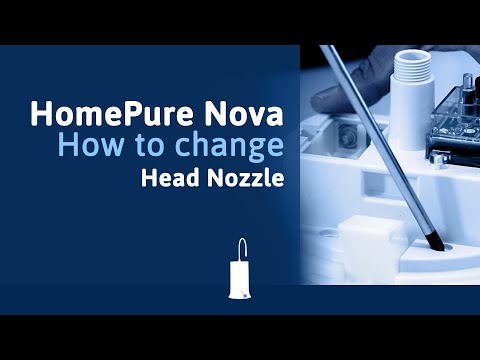
- Remove the flexible pipe cover and pull off the top cover.
- Remove the retainer ring to unlock the filter.
- Turn on the valve and press the ejector firmly to remove the head adapter from the filter unit.
- Twist the filter cartridge to release it from the head adapter.
- Open the battery cover and remove the batteries.
- Remove all 4 plastic seals from the head adapter.
- Remove the screws that were under the plastic seals.
- Press the ejector firmly to remove the top part from its base.
- Use a screwdriver to remove the LED indicator PCB set.
- Replace the old head nozzle with the new one.
- Reassemble the LED indicator PCB set with the head nozzle.
- Place the battery and battery cover back in place.
- Reassemble the top part with the head adapter.
- Place the plastic seals back onto the head adapter to conceal the screw holes.
- Reattach the filter cartridge to the head adapter.
- Place the filter and head adapter back into the unit. Ensure that it locks firmly in place.
- Reassemble the retainer ring and all other parts.
Renewing the Head Adapter Set
The head adapter set connects various components of your HomePure Nova. Your head adapter set might be need replacement if you observe that water is leaking from the head nozzle. If your PCB set is damaged, you would also likely need to change your head adapter set.

- Remove the flexible pipe and pull off the top cover.
- Remove the retainer ring to unlock the filter.
- Turn on the valve and press the ejector firmly to remove the head adapter and filter from the unit.
- Twist the filter cartridge to release it from the head adapter.
- Replace the old head adapter with the new one.
- Reattach the filter cartridge with the head adapter.
- Place the filter and head adapter back into the unit. Ensure that it locks firmly in place.
- Reassemble the retainer ring and all other parts respectively.
Installing the Retainer Ring
The retainer ring provides a secure lock for your HomePure Nova. When water starts leaking from the one-filter case and body of the unit, it might be time to replace retainer ring.

- Remove the flexible pipe and pull off the top cover.
- Remove the damaged retainer ring and replace it with a new one.
- Reassemble all parts respectively.
Changing the Silicone Cap
The silicone cap protects the reset button inside your HomePure Nova. When you observe abnormalities in the LED light or the PCB becomes faulty due to water damage, the unit’s silicone cap might be torn or broken.

- Remove the flexible pipe and pull off the top cover.
- Remove the silicone cap that protects the rest button inside and replace it with a new one.
- Reassemble all parts respectively.
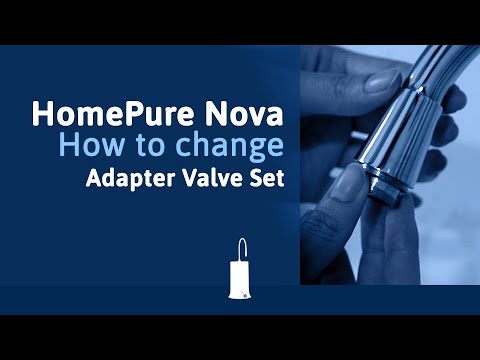
Installing an Adapter Valve
Your HomePure Nova comes with three adapter valves that ensure your unit’s compatibility with different faucet types. Here’s how to install the right one.
- Remove the diverter valve from the faucet.
- Select the adapter valve that fits the faucet and attach it to the diverter valve.
- Reassemble all parts respectively.
Replacing the Diverter Valve
The diverter valve controls the flow of water to your HomePure Nova. It may get damaged due to the accumulation of hard calcium over a long period of use. When water starts to leak from it, it’s time to install a new diverter valve.

- Detach the installation hose from the adapter valve.
- Unscrew the diverter valve from the faucet and replace it with a new one.
- Reattach the installation hose.
Swapping the Installation Hose
The installation hose connects your HomePure Nova to the faucet. With prolonged use, this hose may accumulate biofilm and hard calcium inside, causing the hose to clog and water to leak from it. A dirty hose like this is not good for your drinking water either, so make sure you replace it when this happens or every two years to ensure cleanliness and safety.

- Close the faucet and diverter valve.
- Remove the installation hose by pressing down on the upper ring of the connector.
- Detach the installation hose from the diverter valve.
- Attach the new installation hose to the diverter valve and tighten the cap.
- Reassemble the other end of the installation hose to the elbow fitting at the back of the unit.
With our user-friendly DIY instructions and helpful video guides, keeping your HomePure Nova water filter in top condition has never been simpler. Armed with basic tools and spare parts, you can effortlessly ensure that your HomePure Nova consistently delivers clean, safe, and refreshing drinking water for your entire family. Say goodbye to the hassle of complicated maintenance and hello to uninterrupted purity with HomePure Nova.


